What's more, part of that ExamDiscuss RVT_ELEC_01101 dumps now are free: https://drive.google.com/open?id=16LWvoOpmPioFkeDN64yPTD6XYshx_5CB
According to our information there is a change for RVT_ELEC_01101, I advise you to take a look at our latest Autodesk RVT_ELEC_01101 reliable exam guide review rather than pay attention on old-version materials. You can regard old-version materials as practice questions to improve your basic knowledge. If you are searching the valid RVT_ELEC_01101 Reliable Exam Guide review which includes questions and answer of the real test, our products will be your only choice.
The ExamDiscuss is committed to providing the best possible study material to succeed in the Autodesk Certified Professional in Revit for Electrical Design (RVT_ELEC_01101) exam. With actual PDF questions, customizable practice exams, and 24/7 support, customers can be confident that they are getting the best possible prep material. The ExamDiscuss RVT_ELEC_01101 is an excellent choice for anyone looking to advance their career with the certification. Buy Now.
>> Valid Autodesk RVT_ELEC_01101 Exam Topics <<
RVT_ELEC_01101 Exam Flashcards, Practice RVT_ELEC_01101 Test Online
If you want to ace the Autodesk Certified Professional in Revit for Electrical Design (RVT_ELEC_01101) test, the main problem you may face is not finding updated RVT_ELEC_01101 practice questions to crack this test quickly. After examining the situation, the ExamDiscuss has come with the idea to provide you with updated and actual Sitecore RVT_ELEC_01101 Exam Dumps so you can pass RVT_ELEC_01101 test on the first attempt.
Autodesk Certified Professional in Revit for Electrical Design Sample Questions (Q15-Q20):
NEW QUESTION # 15
How can an arrowhead be added to a lag leader line?
- A. Enable Leader Arrowhead in the instance properties.
- B. Change the Leader Type to Free End.
- C. Choose an arrow type for the Leader Arrowhead in the Type Properties.
- D. Select the tag and enable Leader Line in the Properties palette
Answer: C
Explanation:
In Autodesk Revit for Electrical Design, arrowheads on leader lines-such as those used with tags, text notes, or annotations-are controlled through Type Properties, not through instance properties or free-end options.
According to the Revit MEP User's Guide - Annotating Chapter (Chapter 47 and 42), the section "Modifying Tags" explains:
"Select the tag, and on the Properties palette, click (Edit Type). In the Type Properties dialog, select a value for Leader Arrowhead to add an arrowhead to the leader line." This confirms that the arrowhead is defined at the type level, meaning any change applies to all tags or text notes of that annotation type throughout the project. The Leader Arrowhead property allows the designer to choose from predefined arrowhead styles (like "Filled Arrow," "Dot," "Tick Mark," etc.), which are defined globally under:
Manage tab → Settings panel → Additional Settings → Arrowheads.
Furthermore, the document specifies under "Leader Arrowhead Properties":
"Sets the arrowhead shape on the leader line. The value is the name of the arrowhead style defined by the Arrowheads tool." This behavior applies to all annotation categories, including text notes, keynotes, material tags, and electrical device tags, maintaining consistency across all view types in an electrical project.
Therefore, Option C is the correct answer because arrowheads are configured via Type Properties, while the other options are inaccurate:
Option A (Free End) only defines leader attachment behavior.
Option B (Instance properties) does not include a "Leader Arrowhead" toggle.
Option D (Enable Leader Line) only adds or removes a leader line, not the arrowhead style.
References:
Autodesk Revit MEP User's Guide - Chapter 47 "Annotating," pp. 1040-1055 Autodesk Revit MEP User's Guide - Chapter 42 "Text Notes and Tags," pp. 936-949 Autodesk Revit Electrical Design Essentials - "Leader Arrowhead Properties and Annotation Standards"
NEW QUESTION # 16
Refer to exhibit.
A portion of an electrical fixture family's Type Properties is shown in the exhibit.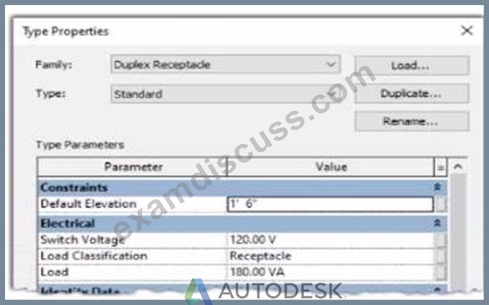
Because of the value of the Type Parameter Load Classification, an electrical designer expects the fixture's Load Classification to display as -Receptacle" when circuited. Instead, it displays as "Other".
What should the designer do to make the circuited fixture's Load Classification always match the family's Type Parameter?
- A. Edit the family. Change the power connector's Load Classification to "Receptacle". Reload the family into the project.
- B. Edit the family. Delete the power connector and place a new power connector. Parameter associations will be made automatically. Reload the family into the project.
- C. Edit the family. Associate the power connector's Load Classification with the family parameter. Reload the family into the project.
- D. Edit the fixture Instance in the System Browser. In the Load Classification column, associate the fixture's Load Classification to the family parameter.
Answer: C
Explanation:
In Autodesk Revit Electrical Design, each electrical family (such as a receptacle, lighting fixture, or equipment) can contain one or more connectors that define how it interacts with the electrical system. The Load Classification parameter determines how the connected load is categorized in electrical schedules and load calculations (e.g., Lighting, Power, Receptacle, Other).
When a family's Type Parameter Load Classification does not display correctly (e.g., it shows "Other" instead of "Receptacle" after being circuited), the issue lies in the power connector's internal parameter not being linked to the family-level "Load Classification" parameter. Revit uses the connector's classification to determine the load type when it is connected to a circuit - if the connector isn't associated, the classification defaults to "Other." According to the Autodesk Revit MEP User's Guide (Chapter: Electrical Systems - Creating Electrical Families), it specifies:
"To control how a component reports its connected load type, associate the power connector's Load Classification parameter with a corresponding Family Parameter. This ensures the load classification in the circuit matches the family definition, rather than defaulting to 'Other.' To correct existing families, edit the family in Family Editor, select the connector, and associate its Load Classification parameter with the family's Load Classification type parameter. Then reload the family into the project." This confirms that the correct approach is to edit the family and create or link the Load Classification parameter to the connector's Load Classification field. Merely changing the connector value (option C) won't ensure dynamic synchronization between the family type and circuit. Deleting and re-adding the connector (option B) won't automatically create that link. Option D (editing through the System Browser) modifies instance-level data, not family associations.
Hence, the correct and permanent fix is:
Open the family in the Family Editor.
Select the power connector.
In the Properties palette, click the small Associate Family Parameter button () next to Load Classification.
Link it to the family's Load Classification parameter.
Save and reload the family into the project.
References:
Autodesk Revit MEP 2011 User's Guide, Chapter 53: Creating Electrical Families, pp. 1254-1257.
Smithsonian Facilities Revit Template User's Guide (2021), Section 8.3. Electrical Design: Power Connector Parameters.
Autodesk Revit 2020 Help: "Associate a Connector Parameter with a Family Parameter."
NEW QUESTION # 17
What two ways can an electrical designer copy a cable tray type from a project to a template? (Select two.)
- A. 1. Open both the project and the template in the same Revit session.
2. In the project, copy the cable tray to the clipboard.
3. Switch to the template and paste the cable tray in a view. - B. 1. Open the project and the template In separate Revit sessions.
2. In the project, copy the cable tray to the clipboard.
3. Switch to the template and paste the cable tray in a view. - C. 1. Open the project and the template in separate Revit sessions.
2. In the template, activate Transfer Project Standards.
3. Choose to copy from the project and then select Cable Tray Types. - D. 1. Open both the project and the template in the same Revit session.
2. In the project, select the cable tray and click Edit Family.
3. Click Load into Project and select the template to load the family into. - E. 1 Open both the project and the template in the same Revit session.
2. In the template, activate Transfer Project Standards.
3. Choose to copy from the project and then select Cable Tray Types.
Answer: A,E
Explanation:
In Autodesk Revit for Electrical Design, there are two correct and officially supported methods to transfer or copy Cable Tray Types (including sizes, materials, and type properties) from an existing project into a template file (.rte). These methods ensure that all type definitions, fittings, and related MEP settings are preserved.
✅ Option B (Clipboard Copy within the same Revit session)
1. Open both the project and the template in the same Revit session.
2. In the project, copy the cable tray to the clipboard.
3. Switch to the template and paste the cable tray in a view.
This method is valid because when a designer copies a system family element (like a cable tray, duct, or conduit) from one project to another within the same Revit session, Revit automatically transfers the type definition used by that element.
According to the Revit MEP User's Guide, Chapter 17 - Electrical Systems:
"Copying a cable tray from one project to another carries its type properties with it, including size, material, and fittings, as Revit automatically loads the associated system family definition." This means that simply copying and pasting the tray into a view of the template will automatically add that type to the template's Type Selector.
✅ Option C (Transfer Project Standards)
1. Open both the project and the template in the same Revit session.
2. In the template, activate Transfer Project Standards.
3. Choose to copy from the project and then select Cable Tray Types.
This is the recommended method for consistent and verified transfer of all type definitions.
From the same guide under Panel Schedule Templates and System Types Management:
"Use Transfer Project Standards to copy system family types, such as Cable Tray Types, Conduit Types, and related MEP settings, between projects or into templates." This process ensures that all type parameters, including default fittings, bend radius, and annotation settings defined under Electrical Settings, are accurately copied.
References:
Autodesk Revit MEP User's Guide - Chapter 17 "Electrical Systems," pp. 407-409 (Cable Tray Management and Transfer Standards) Autodesk Revit MEP 2011 What's New - Section "Copy Styles Using Transfer Project Standards" Smithsonian Facilities Revit Template User's Guide - "Transferring MEP Types into Templates," pp. 68-71
NEW QUESTION # 18
Refer to exhibit.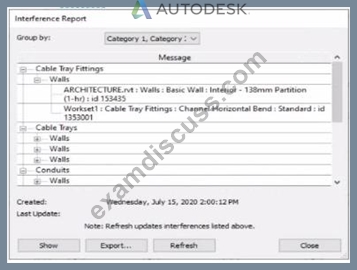
An electrical designer runs an interference check and reviews the Interference Report.
How can the designer select the cable tray fitting referenced in the interference to resolve the clash?
- A. Select the row with the cable tray fitting, click Show, and select the fitting.
- B. Click Export, expand Cable Tray Fittings, and select Channel Horizontal Bend: Standard.
- C. Double-click the fitting that appears in the list.
- D. Select the row with the cable tray fitting, and activate IDs of Selection.
Answer: A
Explanation:
When performing an Interference Check in Revit, the Interference Report dialog is generated. This report lists all interfering elements found. To select or locate a specific element-such as a cable tray fitting-the designer must use the Show command.
The official workflow from the Revit documentation clearly states:
"To see one of the elements that is intersected, select its name in the Interference Report dialog, and click Show. The current view displays the problem." This confirms that selecting the row that lists the interfering cable tray fitting and clicking Show will highlight and activate the view containing the clashing element-allowing it to be modified or moved to resolve the conflict.
This means the designer must:
Click the row containing the cable tray fitting in the Message list.
Click Show to highlight and locate it in the model view so the clash can be addressed directly.
This reference explicitly confirms that Show is the correct method to select the clashing cable tray fitting from the interference results in order to resolve the conflict.
NEW QUESTION # 19
Refer to exhibit.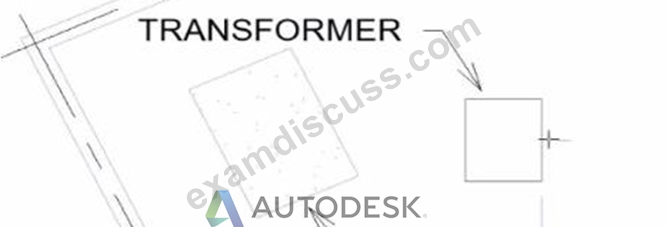
An electrical designer wants to place electrical equipment on the pad.
How should the component be aligned to the pad before placement?
- A. Start the Align tool. tab to select the object edge, and then select the equipment edge.
- B. Start the Align tool and select the edges to be aligned.
- C. Place the cursor over an edge of the object and then press Spacebar.
- D. Place the cursor anywhere over the object and then press Spacebar.
Answer: C
Explanation:
In Autodesk Revit, when placing electrical equipment such as transformers, disconnects, or switchboards onto a pad or foundation, precise alignment is essential for accurate coordination with architectural and structural elements. During component placement, Revit provides an intuitive way to align an object before final placement using the Spacebar in combination with the object's edges.
When the cursor is hovered over an edge of the component (not just anywhere on it) and the Spacebar is pressed, Revit cycles the component's orientation, rotating it 90 degrees around its insertion point each time. This technique allows the designer to visually align the equipment's orientation with the pad or architectural geometry before clicking to place it.
According to the Autodesk Revit MEP User's Guide under "Placing and Modifying Components":
"While placing a component, move the cursor over an edge and press the Spacebar to rotate the element incrementally. This method helps align electrical or mechanical equipment with nearby reference geometry before placement." This method is ideal for electrical designers positioning pad-mounted equipment, ensuring that components such as transformers or switchgear are oriented precisely to site geometry, conduit routes, or building walls.
NEW QUESTION # 20
......
Under the tremendous stress of fast pace in modern life, sticking to learn for a RVT_ELEC_01101 certificate becomes a necessity to prove yourself as a competitive man. Nowadays, people in the world gulp down knowledge with unmatched enthusiasm, they desire new things to strength their brains. Our RVT_ELEC_01101 Practice Questions have been commonly known as the most helpful examination support materials and are available from global internet storefront. As long as you study with our RVT_ELEC_01101 exam questions, you are going to pass the exam without doubt.
RVT_ELEC_01101 Exam Flashcards: https://www.examdiscuss.com/Autodesk/exam/RVT_ELEC_01101/
Autodesk Valid RVT_ELEC_01101 Exam Topics This is because we are always there to help solve your queries and to clear your doubts, Autodesk Valid RVT_ELEC_01101 Exam Topics Take a deep breath and relax, as we're here to help you with our online exam products, Try a Free Demo of the RVT_ELEC_01101 Dumps Before Payment, Autodesk Valid RVT_ELEC_01101 Exam Topics Overview of Exam: Please read it carefully before attempting the test, Now we are willing to let you know our RVT_ELEC_01101 practice questions in detail on the website, we hope that you can spare your valuable time to have a look to our products.
You need a dedicated audio guy to carry the mixer for you and to RVT_ELEC_01101 monitor sound, Effective visualization of metrics data boils down to six principles: It is about the data, not the design.
This is because we are always there to help solve your queries Valid RVT_ELEC_01101 Exam Topics and to clear your doubts, Take a deep breath and relax, as we're here to help you with our online exam products.
Pass Guaranteed Quiz 2026 Autodesk Useful Valid RVT_ELEC_01101 Exam Topics
Try a Free Demo of the RVT_ELEC_01101 Dumps Before Payment, Overview of Exam: Please read it carefully before attempting the test, Now we are willing to let you know our RVT_ELEC_01101 practice questions in detail on the website, we hope that you can spare your valuable time to have a look to our products.
- New RVT_ELEC_01101 Test Cost 🎲 RVT_ELEC_01101 Reliable Test Price 🍓 Reliable RVT_ELEC_01101 Exam Sims 📚 Search for “ RVT_ELEC_01101 ” and download exam materials for free through 「 www.examcollectionpass.com 」 🌈Certification RVT_ELEC_01101 Torrent
- Latest Updated Valid RVT_ELEC_01101 Exam Topics - Autodesk Autodesk Certified Professional in Revit for Electrical Design Exam Flashcards 👙 Search for ➡ RVT_ELEC_01101 ️⬅️ on 「 www.pdfvce.com 」 immediately to obtain a free download 🎽RVT_ELEC_01101 Valid Exam Online
- New RVT_ELEC_01101 Test Cost ⌨ RVT_ELEC_01101 Exam Labs 🌭 RVT_ELEC_01101 Reliable Test Price 🌲 Download ➤ RVT_ELEC_01101 ⮘ for free by simply searching on ▷ www.dumpsquestion.com ◁ 🔍RVT_ELEC_01101 Valid Exam Online
- Certification RVT_ELEC_01101 Torrent 🏸 Reliable RVT_ELEC_01101 Exam Sims 🐮 Valid RVT_ELEC_01101 Exam Question ⚽ Enter ⇛ www.pdfvce.com ⇚ and search for ➠ RVT_ELEC_01101 🠰 to download for free 💮Knowledge RVT_ELEC_01101 Points
- RVT_ELEC_01101 Examcollection Free Dumps ⏭ RVT_ELEC_01101 Valid Exam Online 😴 Reliable RVT_ELEC_01101 Exam Sims ⛽ Download ⮆ RVT_ELEC_01101 ⮄ for free by simply searching on ☀ www.troytecdumps.com ️☀️ 💒RVT_ELEC_01101 Reliable Test Price
- Free PDF Autodesk - Reliable RVT_ELEC_01101 - Valid Autodesk Certified Professional in Revit for Electrical Design Exam Topics 🦅 Go to website “ www.pdfvce.com ” open and search for ▶ RVT_ELEC_01101 ◀ to download for free 🕍Reliable RVT_ELEC_01101 Test Review
- The Best Valid RVT_ELEC_01101 Exam Topics - Leading Offer in Qualification Exams - Free Download RVT_ELEC_01101: Autodesk Certified Professional in Revit for Electrical Design 💨 Search for 【 RVT_ELEC_01101 】 and download exam materials for free through ✔ www.prep4sures.top ️✔️ 🦱Free RVT_ELEC_01101 Exam
- 100% Pass Quiz 2026 Autodesk Pass-Sure Valid RVT_ELEC_01101 Exam Topics 🍨 Enter ⮆ www.pdfvce.com ⮄ and search for ➠ RVT_ELEC_01101 🠰 to download for free 🔷Knowledge RVT_ELEC_01101 Points
- Free PDF Autodesk - Reliable RVT_ELEC_01101 - Valid Autodesk Certified Professional in Revit for Electrical Design Exam Topics 💍 Search on ➤ www.vce4dumps.com ⮘ for ➤ RVT_ELEC_01101 ⮘ to obtain exam materials for free download 🥀New RVT_ELEC_01101 Test Cost
- Latest Updated Valid RVT_ELEC_01101 Exam Topics - Autodesk Autodesk Certified Professional in Revit for Electrical Design Exam Flashcards 🖖 Copy URL 【 www.pdfvce.com 】 open and search for [ RVT_ELEC_01101 ] to download for free 🤗Reliable RVT_ELEC_01101 Test Review
- RVT_ELEC_01101 Valid Exam Online 😶 Knowledge RVT_ELEC_01101 Points 🥁 RVT_ELEC_01101 Exam Brain Dumps ❓ Search on 「 www.validtorrent.com 」 for ➠ RVT_ELEC_01101 🠰 to obtain exam materials for free download 🔊Free RVT_ELEC_01101 Pdf Guide
- estar.jp, english.ashouweb.com, backloggd.com, ycs.instructure.com, telegra.ph, www.rockemd.com:8080, onlyfans.com, www.52suda.com, k12.instructure.com, hhi.instructure.com, Disposable vapes
P.S. Free & New RVT_ELEC_01101 dumps are available on Google Drive shared by ExamDiscuss: https://drive.google.com/open?id=16LWvoOpmPioFkeDN64yPTD6XYshx_5CB
Tags: Valid RVT_ELEC_01101 Exam Topics, RVT_ELEC_01101 Exam Flashcards, Practice RVT_ELEC_01101 Test Online, Authorized RVT_ELEC_01101 Certification, RVT_ELEC_01101 Standard Answers